Over the last month I have been out on location shooting shooting various weddings. I have completed two weddings recently one on my own and the second one which I was the second photographer.
Detailed below are some accounts of the day's photography,planning,techniques and equipment used.
I was commissioned by a colleague of mine to be the second photographer at one of the weddings he was shooting recently.We met a few weeks previously to pre plan the shoot and discuss all of the business side of things.I was paid an agreed fee for this work and wasn't paid by the hour
We me up a second time at the actual location of the wedding to get ourselves accustomed with the venue and to plan out shooting strategies and to check on lighting and exposures
I was given the brief for the day by my colleague shown here below which listed all of the shooting requirements for the day
These were the costs I incurred for the day's photography
Petrol costs £10.00
Batteries for flash photography £ 5.00
Meals and drinks at the location £14.00
I arrived at the wedding location a local golf club and hotel at 11am with all of my equipment ready for the day. I was using 2 cameras on the day a Canon 5D3 and a Canon 7D I was given a client brief of what I was to photograph on the day by my colleague the main photographer
It is very important to have two cameras at the ready to record images on the day as you cannot allow for mistakes on an occasion like this. A backup camera is essential because if you loose all images on one camera at least you will have some images of the day on the other camera to use as a back up
I particularly used a Canon 5D for most of the closeup portrait shots as this is a full frame format camera which produces really fine detail on its images.This allows for large print enlargements or close crops of the photo to be made with out without hardly any noise evident. Using a full frame censor allowed more light into the camera which enabled me to shoot at lower light levels as opposed to using my other Canon 7D camera which is a CSC crop sensor
My brief was to photograph the groom and the best man as they arrived at the golf course as my colleage would be phtographing the bride getting ready at her own house. I phtographed the pair in a variety of different poses and locations
My brief also needed me to capture the happy couple coming back down the isle out of the reception once they were married and to capture the spirit and emotion of their happy faces
For both weddings I used the software "Photoshop and Bridge" to post process my images
I used Photoshop to manipulate,crop,resizemy images which are are enhanced using these techniques.
I used a vignette on some of the images which gives a slightly dated kind of feel to my images this technique works really well on monochrome images. Other techniques include adding more noise using the noise filters which are built into photoshop. I also use a soft sharpen type of technique using different layers in photoshop which creates a nice soft focus
I use bridge for a variety of reasons and this software has a multitude of different uses. This software's main purpose is a file management viewer which allows you to catalogue sort batch and batch process images. It is a very useful piece of software. Bridge is actually built into Photoshop so you are getting two pieces of software for the price of one
Showing posts with label Unit 3 Outcome 2. Show all posts
Showing posts with label Unit 3 Outcome 2. Show all posts
Thursday, 27 June 2013
Friday, 3 May 2013
Kids in a sweet shop (FA sports week)
College disability sports coaching shoot

Well what an opportunity to photograph at St Geoges park again.We have to thank all the staff at Burton College who made this opportunity possible.This was an opportunity for photography students to photograph some of the country's top best known footballers,managers, and famous faces from the FA and the the premiership football league
On this occasion we were given a fantastic opportunity to use some of Canon's high end L series lenses which ranged in six from 200-600mm. These were supplied on a loan basis to the college from one of Canon's many suppliers Calumet
We were all working to a brief to capture on camera all aspects of a disability coaching experience given to able bodied persons which enabled them to experience the difficulties disabled people have when trying to play different sports
We used these lenses specifically for their long range capabilities which enabled us to get amongst the action and shoot from touchlines to the other end of the pitch.These lenses are essential for this type of photography which can capture fine detail form a vast distance
Along with these lenses we were using Canon top end 1DX cameras which have a fantastic frame rate per second. These cameras are capable of shooting up to 14 FPS in raw format which is essential for recording fast action in a sports environment
We were given a certain time frame to produce the images so it was essential to work to a well planned brief and action plan
Shown in the photo's here are some of the course attendees wearing blindfolds which enabled them to experience what it is actually like to play different sports when you are blind or disabled
These were the lenses we used on the day:
500 mm F4 IS L Series prime
400 mm F2.8 IS L Series prime
200-400 mm L Series F4 IS USM Zoom
70-200mm L Series 2.8 IS USM Zoom

Shown here are some of the shots taken during the day using the lenses at apertures of F2.8 and F4 which produced some fantastic results. The clarity of these lenses is second to none and the "bokeh" produced by the lens is awesome which makes your subject stand out from it's background

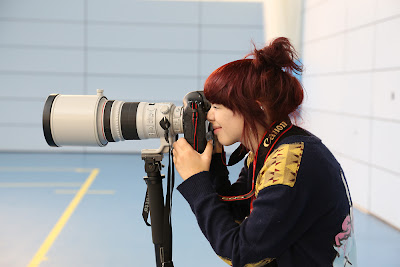
Shown here is a shot of myself using one of the lenses a 200-400 Zoom


The lenses were extremely heavy and it was essential to use a mono pod to take the weight of the lenses.This also eliminated camera shake and camera blur enabling constant crystal clear images to be taken throughout the day


On this occasion we were given a fantastic opportunity to use some of Canon's high end L series lenses which ranged in six from 200-600mm. These were supplied on a loan basis to the college from one of Canon's many suppliers Calumet
We were all working to a brief to capture on camera all aspects of a disability coaching experience given to able bodied persons which enabled them to experience the difficulties disabled people have when trying to play different sports
We used these lenses specifically for their long range capabilities which enabled us to get amongst the action and shoot from touchlines to the other end of the pitch.These lenses are essential for this type of photography which can capture fine detail form a vast distance
Along with these lenses we were using Canon top end 1DX cameras which have a fantastic frame rate per second. These cameras are capable of shooting up to 14 FPS in raw format which is essential for recording fast action in a sports environment
We were given a certain time frame to produce the images so it was essential to work to a well planned brief and action plan
Shown in the photo's here are some of the course attendees wearing blindfolds which enabled them to experience what it is actually like to play different sports when you are blind or disabled

These were the lenses we used on the day:
500 mm F4 IS L Series prime
400 mm F2.8 IS L Series prime
200-400 mm L Series F4 IS USM Zoom
70-200mm L Series 2.8 IS USM Zoom

Shown here are some of the shots taken during the day using the lenses at apertures of F2.8 and F4 which produced some fantastic results. The clarity of these lenses is second to none and the "bokeh" produced by the lens is awesome which makes your subject stand out from it's background

Shown here is a shot of myself using one of the lenses a 200-400 Zoom

Shown here is the price taken from an average website


Shown here is our tutor Steve Davies along with various students from our college showing off a selection of the lenses used throughout the day
Shown below are some of the lenses being packed away for transportation. The lenses came in very sturdy well padded cases which were essential for protection and transportation. These lenses have to be handled with extreme care as the cost of some of them is in the region of up to £12,000 + each

The images we produced on the day will be used for marketing and publicity purposes to bring attention and awareness of dissabilty in sport. The images have now been published and showcased on the website flicker and other online websites
Monday, 29 April 2013
Film Noir (Image manipulation)
I was commissioned by a friend to shoot some images of a 30th birthday party. I was given a brief to produce some old style images and the theme of the party was 20's 30's film noir night,which roughly translates to old black and white films and characters from this era.The party goers were all dressed as different characters from this era in time and I was asked to manipulate the images to possibly reflect and emulate this era in time
The images were all shot in a local hotel.The images were shot with a Canon 5D3 and a Canon 430 speedlight. The ceiling of the hotel was very low so I bounced the flash to give an even spread of light to eluminate my subjects
I mainly used photoshop for this procedure using various layers to change the images structures. I firstly desaturated the images to black and white then added a texture from my library of textured images to give the images an aged feel
I used a third party piece of software which has some in built filters to shift the focal point of the image of centre to another part of the image and also added a blurred vignette to the edges of the images
Shown here are the finished images which I think portray the 1920's-30's era that my client requested


Shown below are the original images shot on the night before manipulation
I have also included some screen grabs of the meta data taken from the images which shows aperture, shutter speeds and other data that my camera was using at the time when the images were shot


Shown here are some more screen grabs of the techniques that I used to desaturate and blend layers together in Photoshop to give my images a sort of old/worn appearance, I think the technique works quite well

Shown below here is a screen grab taken from Bridge of some of my textures that I use to add to my images. I have a library of textures which I collect and add to and it's amazing how many different textures there are out there if you just open your eyes and look for them
The texture I used in the images above here was taken from a very old tree which had some interesting patterns,shadows and grooves,which when desaturated produces the ideal layer to give my images an old /worn look

Shown below are some of the images I used for ideas and inspiration for this project.These were general images taken from the Internet which gave me posing ideas, information on hairstyles and ideas to create the ambiance of the images


The final images were sent to print at an online print processor named Loxley Colour one of the best online photo printers in the business. The prints were requested in various sizes and printed on an extreme matt paper which gave the images an authentic look and feel which the client was really please with. The images were then mounted in a photographic album of the clients choice and presented to my client as the finished article
Thursday, 10 November 2011
Flash Techniques

Over the last 6 months I have been using even more flash in my photography. I bought a Canon 430EX 2 speed-light for some weddings I was photographing to assist me with enhancing my images and to use mainly as fill in flash
Jim my work colleague being a bit of an expert on the subject has been giving me lots of tuition on using speed-lights recently and at long last I think I have mastered these wonderful gadgets
At first I thought like everybody else,stick it on auto and fire away. Wrong, this is the worst thing you can do with such a great piece of equipment, you must learn how to use it and get to balance your flash with ambient light, the results can be amazing
It took me some time to understand the flash and learn how to use it but now I think i am reaping benefits of my studies
At first I didn't understand sync speeds but after some studying,reading and watching video's I have finally got my head around them now. I understand the science of the subject now and everything has fell into place
Here's a brief explanation of sync speeds and what they do:
Sync speed is the fastest shutter speed you can use with that flash with your camera
When you take a picture, the shutter opens and closes to let light strike the image sensor. When it does so, the shutter is fully open for a very short time. If the shutter speed is too fast, the burst of light from the flash won't fully expose all parts of the image sensor and part of the scene won't be captured in the image. The fastest shutter speed that can be used is called the flash synchronization speed and is usually between 1/125-1/500 second. My Canon 7 D uses a sync of 1/250th sec. If you select a faster shutter speed directly or indirectly, most cameras will override you and lower it. The shutter works with two curtains, a front and rear (sometimes called first and second curtains). The shutter opens when the front curtain slides out of the way and ends when the rear curtain slides to close it. The flash fires either when the shutter first fully opens or just before it's about to close.

Shown here are some images that explain the process
(Top row) Front/first curtain sync (the usual mode) means the flash fires when the shutter's front curtain first fully opens to expose the image sensor.
- (Bottom row) Rear/second curtain sync means the flash fires just before the shutter's rear curtain starts to close to end the exposure.

A focal plane shutter opens a curtain to begin an exposure and closes a second curtain to end it. At fast shutter speeds (top) the second curtain starts to end the exposure before the first curtain has fully opened so the two curtains form a slit traveling across the image sensor. Flash would only expose the area uncovered by the slit between the two rapidly moving curtains. At the flash sync speed and slower (bottom) the second curtain doesn't start to close until the first one is fully open.
Subscribe to:
Posts (Atom)