Over the last month I have been out on location shooting shooting various weddings. I have completed two weddings recently one on my own and the second one which I was the second photographer.
Detailed below are some accounts of the day's photography,planning,techniques and equipment used.
I was commissioned by a colleague of mine to be the second photographer at one of the weddings he was shooting recently.We met a few weeks previously to pre plan the shoot and discuss all of the business side of things.I was paid an agreed fee for this work and wasn't paid by the hour
We me up a second time at the actual location of the wedding to get ourselves accustomed with the venue and to plan out shooting strategies and to check on lighting and exposures
I was given the brief for the day by my colleague shown here below which listed all of the shooting requirements for the day
These were the costs I incurred for the day's photography
Petrol costs £10.00
Batteries for flash photography £ 5.00
Meals and drinks at the location £14.00
I arrived at the wedding location a local golf club and hotel at 11am with all of my equipment ready for the day. I was using 2 cameras on the day a Canon 5D3 and a Canon 7D I was given a client brief of what I was to photograph on the day by my colleague the main photographer
It is very important to have two cameras at the ready to record images on the day as you cannot allow for mistakes on an occasion like this. A backup camera is essential because if you loose all images on one camera at least you will have some images of the day on the other camera to use as a back up
I particularly used a Canon 5D for most of the closeup portrait shots as this is a full frame format camera which produces really fine detail on its images.This allows for large print enlargements or close crops of the photo to be made with out without hardly any noise evident. Using a full frame censor allowed more light into the camera which enabled me to shoot at lower light levels as opposed to using my other Canon 7D camera which is a CSC crop sensor
My brief was to photograph the groom and the best man as they arrived at the golf course as my colleage would be phtographing the bride getting ready at her own house. I phtographed the pair in a variety of different poses and locations
My brief also needed me to capture the happy couple coming back down the isle out of the reception once they were married and to capture the spirit and emotion of their happy faces
For both weddings I used the software "Photoshop and Bridge" to post process my images
I used Photoshop to manipulate,crop,resizemy images which are are enhanced using these techniques.
I used a vignette on some of the images which gives a slightly dated kind of feel to my images this technique works really well on monochrome images. Other techniques include adding more noise using the noise filters which are built into photoshop. I also use a soft sharpen type of technique using different layers in photoshop which creates a nice soft focus
I use bridge for a variety of reasons and this software has a multitude of different uses. This software's main purpose is a file management viewer which allows you to catalogue sort batch and batch process images. It is a very useful piece of software. Bridge is actually built into Photoshop so you are getting two pieces of software for the price of one
Showing posts with label Unit 9 Outcome 4. Show all posts
Showing posts with label Unit 9 Outcome 4. Show all posts
Thursday, 27 June 2013
Sunday, 23 June 2013
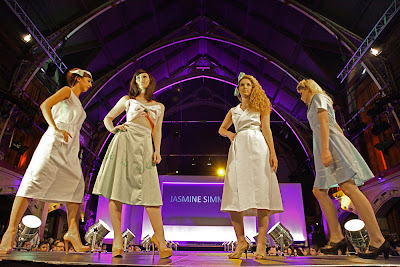
College Fashion Show 2013
I was given the opportunity to photograph Burton and South Derbyshire college's end of the year/term exhibition and fashion show this year at Burton Town Hall
Shown here are just a small selection of fashion show images that I have produced on the night. I was commissioned to shoot the images for the college's archives which will be used for future reference to be viewed by student's staff and interested party's
All of the images were produced using a Canon 5D3 camera with no flash just using ambient light at an ISO of 4000
It's just amazing what these cameras can achieve now and the results can be exceptional without the slightest hint of noise in your photographs


Friday, 3 May 2013
Kids in a sweet shop (FA sports week)
College disability sports coaching shoot

Well what an opportunity to photograph at St Geoges park again.We have to thank all the staff at Burton College who made this opportunity possible.This was an opportunity for photography students to photograph some of the country's top best known footballers,managers, and famous faces from the FA and the the premiership football league
On this occasion we were given a fantastic opportunity to use some of Canon's high end L series lenses which ranged in six from 200-600mm. These were supplied on a loan basis to the college from one of Canon's many suppliers Calumet
We were all working to a brief to capture on camera all aspects of a disability coaching experience given to able bodied persons which enabled them to experience the difficulties disabled people have when trying to play different sports
We used these lenses specifically for their long range capabilities which enabled us to get amongst the action and shoot from touchlines to the other end of the pitch.These lenses are essential for this type of photography which can capture fine detail form a vast distance
Along with these lenses we were using Canon top end 1DX cameras which have a fantastic frame rate per second. These cameras are capable of shooting up to 14 FPS in raw format which is essential for recording fast action in a sports environment
We were given a certain time frame to produce the images so it was essential to work to a well planned brief and action plan
Shown in the photo's here are some of the course attendees wearing blindfolds which enabled them to experience what it is actually like to play different sports when you are blind or disabled
These were the lenses we used on the day:
500 mm F4 IS L Series prime
400 mm F2.8 IS L Series prime
200-400 mm L Series F4 IS USM Zoom
70-200mm L Series 2.8 IS USM Zoom

Shown here are some of the shots taken during the day using the lenses at apertures of F2.8 and F4 which produced some fantastic results. The clarity of these lenses is second to none and the "bokeh" produced by the lens is awesome which makes your subject stand out from it's background

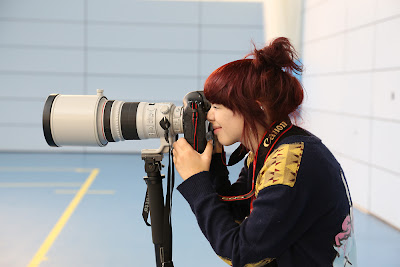
Shown here is a shot of myself using one of the lenses a 200-400 Zoom


The lenses were extremely heavy and it was essential to use a mono pod to take the weight of the lenses.This also eliminated camera shake and camera blur enabling constant crystal clear images to be taken throughout the day


On this occasion we were given a fantastic opportunity to use some of Canon's high end L series lenses which ranged in six from 200-600mm. These were supplied on a loan basis to the college from one of Canon's many suppliers Calumet
We were all working to a brief to capture on camera all aspects of a disability coaching experience given to able bodied persons which enabled them to experience the difficulties disabled people have when trying to play different sports
We used these lenses specifically for their long range capabilities which enabled us to get amongst the action and shoot from touchlines to the other end of the pitch.These lenses are essential for this type of photography which can capture fine detail form a vast distance
Along with these lenses we were using Canon top end 1DX cameras which have a fantastic frame rate per second. These cameras are capable of shooting up to 14 FPS in raw format which is essential for recording fast action in a sports environment
We were given a certain time frame to produce the images so it was essential to work to a well planned brief and action plan
Shown in the photo's here are some of the course attendees wearing blindfolds which enabled them to experience what it is actually like to play different sports when you are blind or disabled

These were the lenses we used on the day:
500 mm F4 IS L Series prime
400 mm F2.8 IS L Series prime
200-400 mm L Series F4 IS USM Zoom
70-200mm L Series 2.8 IS USM Zoom

Shown here are some of the shots taken during the day using the lenses at apertures of F2.8 and F4 which produced some fantastic results. The clarity of these lenses is second to none and the "bokeh" produced by the lens is awesome which makes your subject stand out from it's background

Shown here is a shot of myself using one of the lenses a 200-400 Zoom

Shown here is the price taken from an average website


Shown here is our tutor Steve Davies along with various students from our college showing off a selection of the lenses used throughout the day
Shown below are some of the lenses being packed away for transportation. The lenses came in very sturdy well padded cases which were essential for protection and transportation. These lenses have to be handled with extreme care as the cost of some of them is in the region of up to £12,000 + each

The images we produced on the day will be used for marketing and publicity purposes to bring attention and awareness of dissabilty in sport. The images have now been published and showcased on the website flicker and other online websites
Thursday, 27 September 2012
I think I'm in love again !!

Well this is my new baby a Canon 5d3 and I took her out for a test drive last weekend on a wedding shoot. Overall first impressions were very impressive it has loads of features but I never really had the time to use many of them so I will be putting it through it's paces over the coming weeks
I bought this camera for its low light capabilities especially as I will be photographing a lot of weddings so I needed a fast camera combined with a fast lens for dark church interiors
This camera fits the bill perfectly so I tried a few test shots in a really dark church interior and shown below are some of the results. I took the shot below at 25600 ISO and wow ! I can't hardly see any noise in the shot. This is a jpg straight out of the camera,no manipulation,nothing, just shot as seen and I'm pretty impressed


A few more shots below which show some really fine detail with really rich colours from the stained glass windows of the church


When this Camara first came out I thought it was very expensive at £3000, however, the prices have now dropped down considerably and you can pickup one of these new models for about £2000
There are still a lot of other features on this camera I need to test and will be trying these out over the coming weeks, I will update this blog later with my findings
If you shop around now you now can buy the canon 5d2 for £1150,an absolute bargain, which is also an excellent camera, I use one of these now for my backup camera and the results are amazing
I wanted full frame cameras for clarity with low noise and thats exactly what you get
If anybody wants to buy these cameras, get in touch and I'll show you where to buy at the lowest prices on the net
Wednesday, 27 June 2012
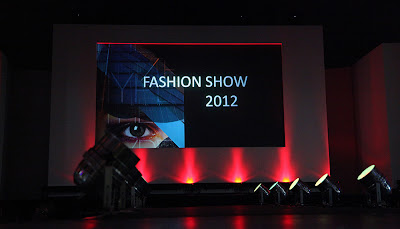
Burton College Fashion Shoot 2012
James Woodings and I were commissioned by Kerry Wilkinson from Burton Chamber of commerce and Emma Strange Course Leader of Burton and south Derbyshire college to produce a set of images for their BSDC 2012 fashion show. The show which is part of the college's annual Creative studies Arts exhibition was held at Burton Town Hall from 18-22nd June
I was granted permission by Kerry Wilkinson to publish some of the images from the night on my blog for course work purposes only
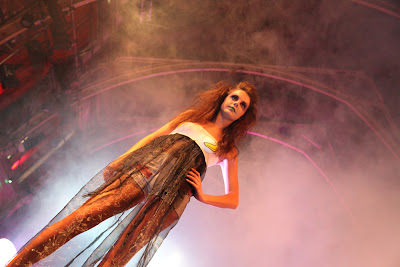
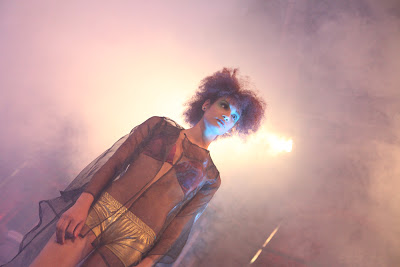
I was given a brief from Emma to produce some ambient light images of the night without the use of any kind of flash or any artificial lighting. The purpose of this was to record the ambiance of the show which would highlight the coloured lighting and smoke effects generated which contributed to the atmosphere of the evening
I decided to use a Canon 5D Mk 2 Full frame camera to record the images. I choose this camera because of it's low light capabilities which enabled me to use really high end ISO speeds without to much noise being evident in my images. This camera is renown for producing excellent quality low light images without the inclusion of hardly any noise at all. The majority of the images were recorded at 4000 ISO and about 30 at 5000 ISO
I was still able to hand hold my camera at these high end ISO's which still enabled me to use a shutter speed of 125th of a second which eliminated any blurred images
The show was lit by a variety of coloured flashing spot/laser/lighting and which played havoc with my camera's light meter. Using my camera's built in light meter under these challenging conditions threw the rule book out of the window and I had to use all of my skill and judgement to conjure up the correct exposures for the images. Thrown into the mix were intermittent blasts of theatrical smoke which made my exposures even more tricky and challenging


I found the models easy to photograph on the evening and there was plenty of time to compose my shots. I moved in very close to the stage edge and most shots were recorded 3-4 feet away from my subjects. Using an aperture of mainly F4 enabled me to let enough light into the camera and still use a fast enough shutter speed to freeze any action


I had to shoot my images quickly and efficiently as I was standing in front of the main audience at the venue. I was crouching down mainly just below and in front of the models. I chose this location and position as to give the maximum amount realism to my shots. Shooting any further back would have included people and rows of seating which would have reined the shots. I was able to steady my camera on the edge of the stage for some of the images


Overall I was very pleased with the majority of images recorded on the night. I shot the images in raw + jpg which gave me the option and versatility to manipulate the images even further in Photoshop. Shooting in raw enabled me to select a number of different white balances should I have needed them
The client was very pleased with the images shot on the evening and James and myself received very positive feedback from Emma who had requested the images. Emma has used and distributed a lot of the images from the shoot amongst students from her college to use in their course work's and projects
I was granted permission by Kerry Wilkinson to publish some of the images from the night on my blog for course work purposes only
I was given a brief from Emma to produce some ambient light images of the night without the use of any kind of flash or any artificial lighting. The purpose of this was to record the ambiance of the show which would highlight the coloured lighting and smoke effects generated which contributed to the atmosphere of the evening
I decided to use a Canon 5D Mk 2 Full frame camera to record the images. I choose this camera because of it's low light capabilities which enabled me to use really high end ISO speeds without to much noise being evident in my images. This camera is renown for producing excellent quality low light images without the inclusion of hardly any noise at all. The majority of the images were recorded at 4000 ISO and about 30 at 5000 ISO
I was still able to hand hold my camera at these high end ISO's which still enabled me to use a shutter speed of 125th of a second which eliminated any blurred images
The show was lit by a variety of coloured flashing spot/laser/lighting and which played havoc with my camera's light meter. Using my camera's built in light meter under these challenging conditions threw the rule book out of the window and I had to use all of my skill and judgement to conjure up the correct exposures for the images. Thrown into the mix were intermittent blasts of theatrical smoke which made my exposures even more tricky and challenging
I found the assignment to be fairly challenging but well within my capabilities. The images shown here were all straight out of camera with just a small amount of sharpening applied
in Photoshop. All were shot with ambient light which which gives a true representation of the ambience of the evening
James and I decided on two approaches to record the images. Jim would be positioned on the rear balcony of the Town Hall looking down onto the models. We decided Jim would record all the formal shots some with flash and some without using a Canon 70-200 F4 Zoom Lens. Jim would record the more narrow angle shots of the models mainly walking on their own along the catwalk.
We agreed I would shoot the more wide angled shots close up to the stage including groups of people, the building and the lighting. To achieve this I used a Canon 24-105 L series wide angle zoom lens. Most shots were taken with 4000 ISO
The shots above were taken more to portray the ambience and atmosphere of the event. I wanted the viewer to feel the atmosphere of the evening. Using any kind of flash lighting would have ruined the shots which would have washed out the colours and illuminated the smoke to intensely. I angled some of my shots which gives the viewer a more interesting perspective and view point of my subjects
I had to shoot my images quickly and efficiently as I was standing in front of the main audience at the venue. I was crouching down mainly just below and in front of the models. I chose this location and position as to give the maximum amount realism to my shots. Shooting any further back would have included people and rows of seating which would have reined the shots. I was able to steady my camera on the edge of the stage for some of the images
The client was very pleased with the images shot on the evening and James and myself received very positive feedback from Emma who had requested the images. Emma has used and distributed a lot of the images from the shoot amongst students from her college to use in their course work's and projects
Thursday, 10 November 2011
Flash Techniques

Over the last 6 months I have been using even more flash in my photography. I bought a Canon 430EX 2 speed-light for some weddings I was photographing to assist me with enhancing my images and to use mainly as fill in flash
Jim my work colleague being a bit of an expert on the subject has been giving me lots of tuition on using speed-lights recently and at long last I think I have mastered these wonderful gadgets
At first I thought like everybody else,stick it on auto and fire away. Wrong, this is the worst thing you can do with such a great piece of equipment, you must learn how to use it and get to balance your flash with ambient light, the results can be amazing
It took me some time to understand the flash and learn how to use it but now I think i am reaping benefits of my studies
At first I didn't understand sync speeds but after some studying,reading and watching video's I have finally got my head around them now. I understand the science of the subject now and everything has fell into place
Here's a brief explanation of sync speeds and what they do:
Sync speed is the fastest shutter speed you can use with that flash with your camera
When you take a picture, the shutter opens and closes to let light strike the image sensor. When it does so, the shutter is fully open for a very short time. If the shutter speed is too fast, the burst of light from the flash won't fully expose all parts of the image sensor and part of the scene won't be captured in the image. The fastest shutter speed that can be used is called the flash synchronization speed and is usually between 1/125-1/500 second. My Canon 7 D uses a sync of 1/250th sec. If you select a faster shutter speed directly or indirectly, most cameras will override you and lower it. The shutter works with two curtains, a front and rear (sometimes called first and second curtains). The shutter opens when the front curtain slides out of the way and ends when the rear curtain slides to close it. The flash fires either when the shutter first fully opens or just before it's about to close.

Shown here are some images that explain the process
(Top row) Front/first curtain sync (the usual mode) means the flash fires when the shutter's front curtain first fully opens to expose the image sensor.
- (Bottom row) Rear/second curtain sync means the flash fires just before the shutter's rear curtain starts to close to end the exposure.

A focal plane shutter opens a curtain to begin an exposure and closes a second curtain to end it. At fast shutter speeds (top) the second curtain starts to end the exposure before the first curtain has fully opened so the two curtains form a slit traveling across the image sensor. Flash would only expose the area uncovered by the slit between the two rapidly moving curtains. At the flash sync speed and slower (bottom) the second curtain doesn't start to close until the first one is fully open.
Monday, 7 November 2011
Images from location shooting (Seascapes)

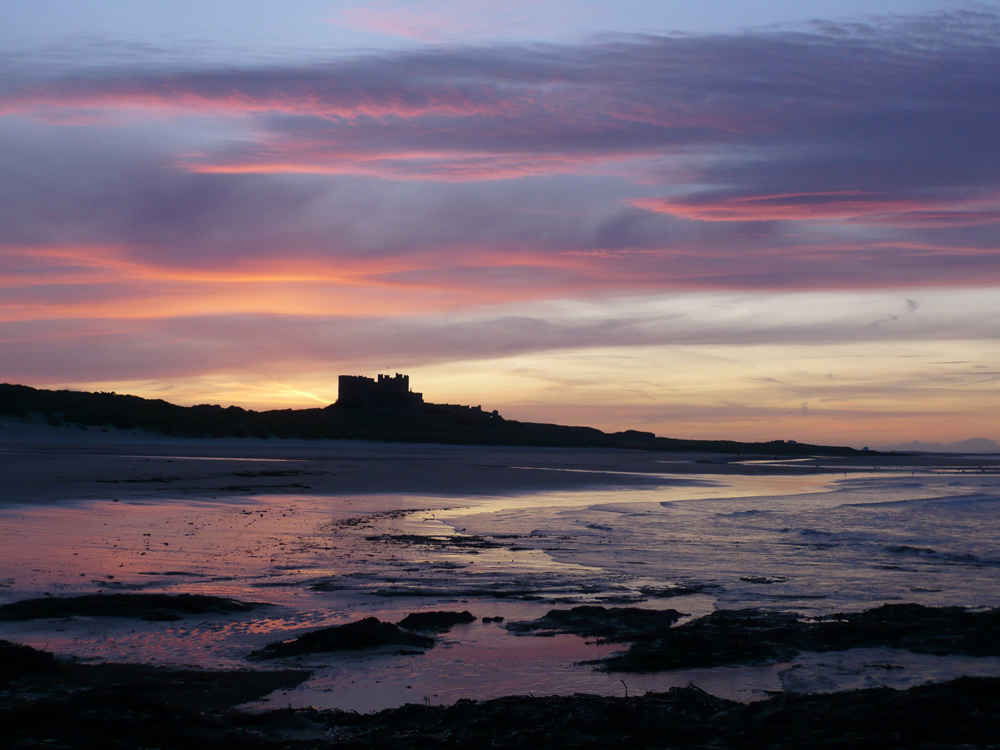
The shot above was taken on Bamburough beach in Northumbria at 6.55 am
The images displayed here are all location shots taken at various outdoor locations using a variety of different methods,skills and techniques which have helped me to develop my photography even further and hopefully take it to the next level.
T
I am constantly trying to develop my photography even further, learning new skills and techniques which I hope will help improve my photography and add to my creativity
The images diplayed here are not by best and far from it. There are a lot of times in photography where I end up feeling very dismayed frustrated and disillusioned mainly because the 3 most important elements to produce a good image do not always come together and are not always evident at the same time
The 3 main elements of a good image which I consider to be really important are:
1- Really good composition
2- Good subject matter or location
3- Excellent lighting
I always pre plan my images and know exactly what content I want to show in my images. I compose my images with great care and will not settle for "that will do" If I cant' compose the shot or some of the elements are missing I don't take the shot
I find I am becoming more selective with my image content and don't agree with the philosophy of taking 20 images of the same shot and hope to to achieve at least one decent one. With this type of image taking the photographer is not considering composition,lighting etc and in artist's terms will never produce a masterpiece

This shot here is all about being at the right place at the right time. This foam was created when the tide was coming back into an estuary at a phonominal rate, 2 minutes after this shot was taken the foam had dispersed and the shot was lost
Again the lighting here was to severe.The shot was taken early in the afternoon and the brightness reflected of the foam was very intense which was washing out my image. To remedy this condition I could'd reduce the intensity of the shot by reducing the ISO as I was already on my camera's lowest ISO setting of 100. I always try to shoot at 100 as this setting always retains the most detail and clarity.The only other technique's I had avaiable to me were to increase my shutter speed or choose a higher F stop and use a smaller apperture. As the shot was a landscape I chose a higher Fstop of F11 from F8 whch halfed the light again entering the camera reducing the light intensity. Using F11 enabled me to increase my depth of field which is more suited to a landscape shot

This shot was taken at 2 pm in the afternoon whch is not an ideal time to take this sort of shot. The sun was high in the sky with brilliant sunshine which does not give the photo any kind of depth and form and produces vivid blue skies which are not pleasing to the eye.
I had to travel to this venue just befor sunrise to record the ideal shot but when I arrived the sky was so dull and bland with no sunlight evident that I abbandoned the shoot. We stayed at this location all afternoon hoping to capture the castle as the sun went down tried but unfortunately after this shot was taken the skies clouded over again whch was another wasted day
The sun did break but this was the middle of the afternoon.This was the only time on this particular day when the sun broke which enabled me to record a half decent image

I took this shot just as the sun was going down but again 1 of the 3 elements let me down. The lighting was missing which was so poor,flat and uninteresting which created a pretty flat image
This shot would have been far better taken ist thing in the morning or just before dusk when we have a low level lighting which is far superior and produces shadows, depth and form. The ideal lighting conditions for most out door photography and especially landscapes is what's known as the golden hour. This is the time of day just after sunrise and just before dusk when the sun produces a lovely rich type of warm light that is only produced at these times of the day. An example of this can be seen in my first shot at the top of the page whch has captured the golden hour lighting as the sun was coming up over the horizon, 2 minutes later this special kind of light had disappeared
I had vistited this location on a couple of previous nights trying to compose some nice cloudscapes but the clouds and lighting were not evident and a decent image would have proved inpossible. On this particular night everything was perfect,location,composition and lighting all critical elemets to produce a good photograph
I took the images below with a budget compact point and shoot pocket camera lent to me by a friend as I had earlier had an accident with my 7D camera and dropped it in the sea
It just goes to show you don't need to have the best camera in the world to produce some lovely images, after all a camera is only a box with a hole in it. I just made sure I got the key elements correct,location,lighting composition and timing


The meta data shown here in this grab shows a shutter speed of 1/40 sec which any photographer knows, hand holding a camera at this speed will result in blurred images. I remedied the camera shake by mounting the camera onto my tripod, setting the camera settings onto a 2 second self timer which eliminated any evidence of camera shake
This camera was lent to me by a friend in an emegency and didnt have any manual modes. The ISO of the camera did go up to 800 but I have learnt from experience using these compact cameras with high end ISO's you end up with extremely high noise levels which can ruin the shot
As I had my tripod at hand I could still use the camera's lowest ISO which was a 100 to maintain clarity with hardly any noise visible
Subscribe to:
Posts (Atom)