Shown below are just some of the many websites that I visit to reserch and gain Ideas to help me to improve my photography, the Internet is the biggest tutor on the planet and the lessons are endless
http://www.thedesignwork.com/magical-art-of-shadow-photography/
http://www.thedesignwork.com/portraiture-photography-by-famous-photographers/
http://www.photography-art-cafe.com/famous-portrait-photographers.html
http://www.popphoto.com/how-to/2011/05/top-10-wedding-photographers
Showing posts with label Unit 9 Outcome 2. Show all posts
Showing posts with label Unit 9 Outcome 2. Show all posts
Thursday, 27 June 2013
Wednesday, 26 June 2013
Balancing Abient light with Studio flash Video
This is a really intuitive video which has helped me to understand how lighting characteristics behave when we balance 2 light sources together,one being the natural light of the sun and the other, the artificial light of studio flash
I am trying out this technique over the coming months of summer using my newly purchased portable studio flash system out on location
Sunday, 23 June 2013
College Fashion Show 2013
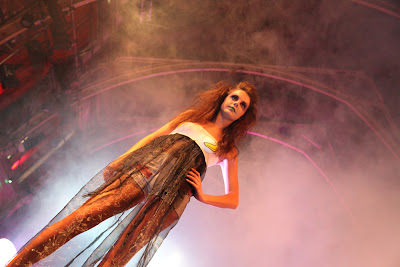
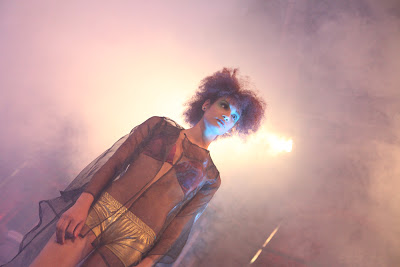
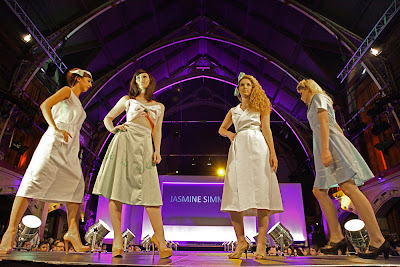
I was given the opportunity to photograph Burton and South Derbyshire college's end of the year/term exhibition and fashion show this year at Burton Town Hall
Shown here are just a small selection of fashion show images that I have produced on the night. I was commissioned to shoot the images for the college's archives which will be used for future reference to be viewed by student's staff and interested party's
All of the images were produced using a Canon 5D3 camera with no flash just using ambient light at an ISO of 4000
It's just amazing what these cameras can achieve now and the results can be exceptional without the slightest hint of noise in your photographs
Sunday, 24 March 2013
Fashion Shoot Planning 23-03-2013
Fashion Shoot Planning
I had planned to shoot some fashion images this weekend and had organised a Fashion shoot in the college studio on Saturday 23rd March.Unfortunately, due to adverse weather conditions I had to cancel the shoot as the college was closed due to heavy snow and freezing temperatures
I now need to re-arrange another date to complete the shoot as all of the planning went out of the window
Planning is a key part in organising a photography shoot and it's critical that everthing comes together for the few hours that a model will be posing behind the camera lens for you
These are the elements that I had to manage and control to bring my shoot together:
Arranage and hire a photography studio
Arrange and hire a model for the phtography session
Arrange for a lighting and prop person to help out with changing of sets and lighting configurations
Plan lighting setups in the photography studio
Research and plan detailed shots and poses of various fashion models
Shown here are some images taken from the Internet which i have used for ideas and inspiration
I was inspired by this very excellent London Fashion photographer Jarek Duk,shown here are some of his images
Wednesday, 27 June 2012
Burton College Fashion Shoot 2012
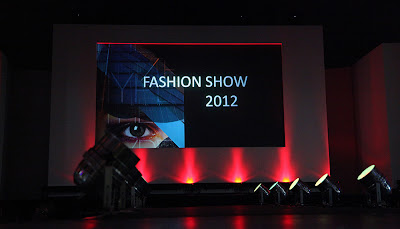
James Woodings and I were commissioned by Kerry Wilkinson from Burton Chamber of commerce and Emma Strange Course Leader of Burton and south Derbyshire college to produce a set of images for their BSDC 2012 fashion show. The show which is part of the college's annual Creative studies Arts exhibition was held at Burton Town Hall from 18-22nd June
I was granted permission by Kerry Wilkinson to publish some of the images from the night on my blog for course work purposes only
I was given a brief from Emma to produce some ambient light images of the night without the use of any kind of flash or any artificial lighting. The purpose of this was to record the ambiance of the show which would highlight the coloured lighting and smoke effects generated which contributed to the atmosphere of the evening
I decided to use a Canon 5D Mk 2 Full frame camera to record the images. I choose this camera because of it's low light capabilities which enabled me to use really high end ISO speeds without to much noise being evident in my images. This camera is renown for producing excellent quality low light images without the inclusion of hardly any noise at all. The majority of the images were recorded at 4000 ISO and about 30 at 5000 ISO
I was still able to hand hold my camera at these high end ISO's which still enabled me to use a shutter speed of 125th of a second which eliminated any blurred images
The show was lit by a variety of coloured flashing spot/laser/lighting and which played havoc with my camera's light meter. Using my camera's built in light meter under these challenging conditions threw the rule book out of the window and I had to use all of my skill and judgement to conjure up the correct exposures for the images. Thrown into the mix were intermittent blasts of theatrical smoke which made my exposures even more tricky and challenging
I found the models easy to photograph on the evening and there was plenty of time to compose my shots. I moved in very close to the stage edge and most shots were recorded 3-4 feet away from my subjects. Using an aperture of mainly F4 enabled me to let enough light into the camera and still use a fast enough shutter speed to freeze any action
I had to shoot my images quickly and efficiently as I was standing in front of the main audience at the venue. I was crouching down mainly just below and in front of the models. I chose this location and position as to give the maximum amount realism to my shots. Shooting any further back would have included people and rows of seating which would have reined the shots. I was able to steady my camera on the edge of the stage for some of the images
Overall I was very pleased with the majority of images recorded on the night. I shot the images in raw + jpg which gave me the option and versatility to manipulate the images even further in Photoshop. Shooting in raw enabled me to select a number of different white balances should I have needed them
The client was very pleased with the images shot on the evening and James and myself received very positive feedback from Emma who had requested the images. Emma has used and distributed a lot of the images from the shoot amongst students from her college to use in their course work's and projects
I was granted permission by Kerry Wilkinson to publish some of the images from the night on my blog for course work purposes only
I was given a brief from Emma to produce some ambient light images of the night without the use of any kind of flash or any artificial lighting. The purpose of this was to record the ambiance of the show which would highlight the coloured lighting and smoke effects generated which contributed to the atmosphere of the evening
I decided to use a Canon 5D Mk 2 Full frame camera to record the images. I choose this camera because of it's low light capabilities which enabled me to use really high end ISO speeds without to much noise being evident in my images. This camera is renown for producing excellent quality low light images without the inclusion of hardly any noise at all. The majority of the images were recorded at 4000 ISO and about 30 at 5000 ISO
I was still able to hand hold my camera at these high end ISO's which still enabled me to use a shutter speed of 125th of a second which eliminated any blurred images
The show was lit by a variety of coloured flashing spot/laser/lighting and which played havoc with my camera's light meter. Using my camera's built in light meter under these challenging conditions threw the rule book out of the window and I had to use all of my skill and judgement to conjure up the correct exposures for the images. Thrown into the mix were intermittent blasts of theatrical smoke which made my exposures even more tricky and challenging
I found the assignment to be fairly challenging but well within my capabilities. The images shown here were all straight out of camera with just a small amount of sharpening applied
in Photoshop. All were shot with ambient light which which gives a true representation of the ambience of the evening
James and I decided on two approaches to record the images. Jim would be positioned on the rear balcony of the Town Hall looking down onto the models. We decided Jim would record all the formal shots some with flash and some without using a Canon 70-200 F4 Zoom Lens. Jim would record the more narrow angle shots of the models mainly walking on their own along the catwalk.
We agreed I would shoot the more wide angled shots close up to the stage including groups of people, the building and the lighting. To achieve this I used a Canon 24-105 L series wide angle zoom lens. Most shots were taken with 4000 ISO
The shots above were taken more to portray the ambience and atmosphere of the event. I wanted the viewer to feel the atmosphere of the evening. Using any kind of flash lighting would have ruined the shots which would have washed out the colours and illuminated the smoke to intensely. I angled some of my shots which gives the viewer a more interesting perspective and view point of my subjects
I had to shoot my images quickly and efficiently as I was standing in front of the main audience at the venue. I was crouching down mainly just below and in front of the models. I chose this location and position as to give the maximum amount realism to my shots. Shooting any further back would have included people and rows of seating which would have reined the shots. I was able to steady my camera on the edge of the stage for some of the images
The client was very pleased with the images shot on the evening and James and myself received very positive feedback from Emma who had requested the images. Emma has used and distributed a lot of the images from the shoot amongst students from her college to use in their course work's and projects
Thursday, 10 November 2011
Flash Techniques
Over the last 6 months I have been using even more flash in my photography. I bought a Canon 430EX 2 speed-light for some weddings I was photographing to assist me with enhancing my images and to use mainly as fill in flash
Jim my work colleague being a bit of an expert on the subject has been giving me lots of tuition on using speed-lights recently and at long last I think I have mastered these wonderful gadgets
At first I thought like everybody else,stick it on auto and fire away. Wrong, this is the worst thing you can do with such a great piece of equipment, you must learn how to use it and get to balance your flash with ambient light, the results can be amazing
It took me some time to understand the flash and learn how to use it but now I think i am reaping benefits of my studies
At first I didn't understand sync speeds but after some studying,reading and watching video's I have finally got my head around them now. I understand the science of the subject now and everything has fell into place
Here's a brief explanation of sync speeds and what they do:
Sync speed is the fastest shutter speed you can use with that flash with your camera
When you take a picture, the shutter opens and closes to let light strike the image sensor. When it does so, the shutter is fully open for a very short time. If the shutter speed is too fast, the burst of light from the flash won't fully expose all parts of the image sensor and part of the scene won't be captured in the image. The fastest shutter speed that can be used is called the flash synchronization speed and is usually between 1/125-1/500 second. My Canon 7 D uses a sync of 1/250th sec. If you select a faster shutter speed directly or indirectly, most cameras will override you and lower it. The shutter works with two curtains, a front and rear (sometimes called first and second curtains). The shutter opens when the front curtain slides out of the way and ends when the rear curtain slides to close it. The flash fires either when the shutter first fully opens or just before it's about to close.
Shown here are some images that explain the process
(Top row) Front/first curtain sync (the usual mode) means the flash fires when the shutter's front curtain first fully opens to expose the image sensor.
- (Bottom row) Rear/second curtain sync means the flash fires just before the shutter's rear curtain starts to close to end the exposure.
A focal plane shutter opens a curtain to begin an exposure and closes a second curtain to end it. At fast shutter speeds (top) the second curtain starts to end the exposure before the first curtain has fully opened so the two curtains form a slit traveling across the image sensor. Flash would only expose the area uncovered by the slit between the two rapidly moving curtains. At the flash sync speed and slower (bottom) the second curtain doesn't start to close until the first one is fully open.
Friday, 7 October 2011
Joe Buissink
Wedding Photographer Joe Buissink
I am in the process of studying various wedding photographers which will help to broaden my knowledge and understanding of this branch of photography which may also contribute to perhaps developing a style of my own. I particularly like the work of this photographer whose style is a very distinct old fashioned,dark moody type of ambiance
Joe Buissink is a talented photographer, who has shot the weddings of many famous people such as Jennifer Lopez, Christina Aguilera, Kelsey Grammar, Christian Slater, Angie Harmon & Jason Sehorn, Lauren Holly, Christina Applegate, Rebecca Romijn, and many, many others. He is a highly sought after photographer and is renowed for his wedding photography throughout the world and voted as one of the Top 10 Wedding Photographers in the World.
I have added some of his images to this page to give an insite into his style of wedding photography. A lot of his images are created using a monochrome style which has a distinct aged type feeling, a style that seems to be in vogue at the moment. A lot of wedding phtographers are copying this kind of style at the moment which seems to be in demand from brides and grooms alike
Shown here are some of his images with the distinctive "Vignetting" style where the edges of the images fade off and darken towards the edge of the image. This technique is used to draw the attention and focus directly to the subject
I am in the process of sourcing a model to pose as a bride for a day where I can begin to experiment with this style of photography. I intend to post produce a lot of the effects in Photoshop to achieve this aged monochrome feel
Shown below is one of his famous images from his book which explains the techniques and camera settings that he uses
The bride and groom were actually waiting for me to come down to take their formal portrait—but this was a perfect moment! This image was heavily burned in and vignetted in the darkroom, a technique that brings the focus where it’s intended, on the bride and groom kissing. Your eyes settle first on the couple, and then wander outward to take in the rest of the image.
Nikon F6, 17-35mm F2.8 lens, f/6.3 at 1⁄50 sec.
de for th
I really love the image below which is not an easy image to capture,this is just an oppotunist moment, I must learn to look for these moments and to think out of the box
The bridesmaids were enjoying a toast, and I first photographed them from the front. However, the more powerful image was actually cast on the wall behind them. The shadows tell a better story, right down to the maid of honor holding two drinks. Had I not had a second camera set up and ready to go, the moment would have been missed.
Canon 5D, 24-70mm F2.8 lens, f/6.3 at 1⁄125 sec.
Canon 5D, 24-70mm F2.8 lens, f/6.3 at 1⁄125 sec.
Detailed below is an abstract from one of Joe Buisisnk's books which I feel is a very useful piece of information. I agree with what he say's here but maybe he has all the time in the world to ponder and create such shots. For most of us, this is not that simple,we only have a few split seconds at a wedding and the shot needs to be bang on the button. We have to concentrate on getting all the formals correct with no room for error. I think the only way I could produce shots like this is to get the couple to come back to the wedding venue and set up all the poses with lots of time to spare
Shown below is an extraxt from one of Joe Buissink's books which details the technique of looking past or through your subjects.
Shown below is an extraxt from one of Joe Buissink's books which details the technique of looking past or through your subjects.
Wedding Photography from the Heart: Creative Techniques to Capture the Moments that Matter,” by Joe Buissink
Looking Beyond Your Subjects: Shadows And Light Learn to look beyond your subjects—literally. Often the most powerful point in a photograph isn’t the subject, but just beyond him or her, in the shadows. It’s about learning to see and training your eyes to perceive texture and contrast. Too many photographers panic when faced with uneven light. But shadows and contrast in lighting are two of your best allies for creating truly amazing prints. Learn to understand every aspect of how your equipment performs and how your subject will look using lenses of different focal lengths.
Although this book is a few years old I find it totally inspirational which has some really distintive photography which a lot of wedding phtographers are trying to emulate at this moment in time
Subscribe to:
Posts (Atom)


